Thursday 20 December 2012

More game modelling

 I have been continuing with the work for Dave's game. Below is a sci-fi type computer terminal for use as either an object you can interactive with or just an object to add a bit more detail to a certain area.
Dave also needed an end game room. The idea he told me was just an escape pod type thing. So I roughed out this quick Escape pod type station. Alot more details need to be added to the walls as well as making a new escape pod from scratch that actually looks good.

The plan at the moment, is to finish up the modelling for all of the rooms/corridors. Then to make some debris, broken lights, broken tiles, barrels, crates, computers, generators, panels and grates/vents for adding detail to rooms.

Next to move onto UV unwrapping. Which I have started on for the basic 5x10 corridor. Then to add textures after that.

Tuesday 4 December 2012

Some testing of the objects

Created a corner section which is simple yet has some nice details in there.
Made this arrangement just to test how things were snapping together. Turns out pretty well. Hope its all okay at Dave's end in Unity.

Saturday 24 November 2012

Rapid Mail Terminal and Door

Rapid Mail Terminal

 Door Closed 
(Door is made of 3 parts, door frame and 2 doors)

Door Open

Thursday 22 November 2012

A little distracted, but maybe in a good way?

So I'm still working on the corridors. While making them in this arrangement I decided to add some lights and just quickly render it. The red and the green lights are point lights and the whitey-blue is an area light. I also worked on making a quick door opening animation. Looked okay. But its early. And the door needs cleaning up and working on more.

Wednesday 21 November 2012

Corridor

Using the basic floor tile and one style of the arch I produced this simple corridor. Not much work here but thats what happens when you make modular objects, its just a matter of piecing them together. Details will be added to break it up. For example differences in the arch's, broken floor tiles and objects like crates and pipes to add some more detail.


I've just been drawing out a plan aswell on graph paper of the different rooms and corridor sections we might need. Things like 'Long corridor', 'short corridor', 'small room', 'large room', 'corner section' etc etc

Thursday 15 November 2012

Arch Modelling and Normal Map Experimenting

So Dave (game's student) told me which designs he liked from the page of designs I sent him. I have now started doing some fairly quick models of them, and he is going to pick 1 or 2 from these. This is a little biased however as I have made more effort for the first ones middle section between the 2 sides therefore resulting in a better model in my opinion. However the other 2 designs still have there merits.


The design above is my favourite possibly because I spent a little bit more time on it.

This one I like for the computer terminal and protruding support sections.
This one is a bit more generic sci fi with miscellaneous pieces which could form pipe works, radiators, coolers etc. 

While modelling a floor panel from the earlier designs, It occured to me to try and generate a normal map from the geometry to reduce the poly count on the game. One of the tiles below is the normal map, the other is the high res geometry model. Can you tell which?


So yeh that was probably easy anyway. The right tile is the normal map. I find the process okay however there were a few hiccups. The process for this was generating a normal map from the top camera view. This was easy as it was a flat object. For things like the arch things above, these need a different process which I need to look into more.

Monday 12 November 2012

Concepts for arch's and floor panels


Drawn up some concepts for the sci-fi corridors. My earlier prototypes were mainly for blocking out and testing how it would work. These are actual designs to which I will see which David likes best.

I feel like a couple of the designs I really had to force out, a feeling I think I get because of my lack of concept skills. Something that should be improved on.

After these, I need to draw up some wall sections, and concepts for the various environment details among many other models to be made.

As a tiny side note, I have managed to sort out getting time off work for my work experience in January. Great news. Now I just have to arrange some cheap decent accommodation.

Thursday 8 November 2012

Interview summary

Interview was yesterday and I think it went really well. It didn't seem so much as a formal interview, more a informal chat about my background and interests and some more details about the placement.

I am officially doing the 14th of January slot which gives me enough time to sort out work arrangements and accomodation (possibly hotel, b&b or temporary student accomodation).

I've also learnt that I will be using Luxology's Modo software during the time there and they are happy to put me in my preference of the modelling and texturing department :)

It was a pleasant chat and learning that the 2 guys that interviewed me had also started as work experience really gave me a boost of confidence in that should everything go well, sometime in the future I could possibly be hoping for a job there.

Aside from learning Modo software, as expected I will also be needed for runner jobs; getting teas and coffees, running to the shops, tidying up etc.

On a last note (albeit a very fun one) I was immediately surprised when I walked into the electric works to find they had a huge indoor helter skelter type slide. How brilliant is that?


Tuesday 6 November 2012

Interview Tomorrow

The work experience interview is tomorrow, organised a tiny bit last minute. Spoke to the company on the phone today and had a reply shortly after. Still unsure which 2 week slot I am doing but I'm sure we can negotiate that.

While I am up there I will take the opportunity to look around the area at possible hotels/B&B's to stay in for  5 of the nights and come home at the weekend, then go back up again for 5 more nights the following week.

Also spoken more with the guy I'm doing work on his game for. He was happy with the early designs I showed and sent to him and he as managed to get the objects working fine in Unity. He also asked me to make some more modular pieces such as; rooms, corridors, cross section corridors, t section etc. So I worked on those quickly tonight and sent to him.

At the moment all my models have been rough around the edges, not aligned properly and don't match in certain areas. This is okay for the prototype/concept stage and is good for getting the ideas down quick. However for future models these should be aligned properly on the grid and match up perfectly on the grid so it looks seamless between 2 models. Also I don't have a particular poly count as such but I was told to be sensible. Use detail where its needed but don't go overboard sums it up pretty much.

I would post some pictures of the recent models but they are pretty boring and similar to the previous pictures so I will post some reference material I have been using to work from. Less so for the prototyping, more so for the final designs which I plan to sketch out some on the train tomorrow.

These range from photos, wireframe models, concept art, fully rendered 3D environments and even tabletop wargame scenery.


Red Star 3D Work Experience Interview


I have been sending some prospective emails over the past couple of months. Many I have had no response back which is the nature of the game. This one place called Red Star 3D in Sheffield fortunately has replied back to me and invited me for an interview. Great news for me!!!

At the minute I'm just in talks of when the interview will be but at this stage I know it will be for 2 weeks work experience some time between now and end of January. Due to work commitments I'm thinking January is the more ideal time for me, however, I would prefer sooner.

Here's a link to their site

Work for a games student

So a games student (from my previous University) has gotten in contact with me about a 3rd year project of his, so I offered to help out. He needs me to model interior parts of a space ship like walls, floors, arches, doors, crates, sci fi type computers etc etc etc.

I haven't spoken to him an awful lot but he has given me a quick run through and its going to be a top down shooter set onboard a spaceship with sci fi styling. So I made these quick mock ups literally in a couple of hours. Nothing too detailed, just to get an idea if this is similar to what he is after.


Wednesday 24 October 2012

An overdue update

So a fair bit to talk about recently.
Firstly, my old computer was on its last limbs so had to order a replacement, it runs fast and smooth great for 3D apps in general and especially speedy in mudbox thanks to the upgraded components.

If any geeks are concerned about the specs they are:

i5 3570k Processor 3.4GHz
16gb of DDR3 Memory
Nvidia Geforce 660Ti graphics card
1Tb Hard drive
(and to utilise the increased amount of memory, Windows 7 64bit)

Secondly, I have had the opportunity for some freelance work. It is unpaid and in the initial stages I'm just trying to prove myself and see if the client likes my work. I don't know how much I can discuss or show at the minute so won't say too much. However the general role of me at the minute is creating a 3D product visualisation and aiming for realism. This would be the first time I have gone for something super realistic so seems a challenge but not something far off what I can reach. I have produced work already but may only show it if I have permission.

Thirdly I am on the lookout for 3D jobs. I think my problem at the minute is lacking experience in the industry. I only have my degree to go on, nothing hands on inside a studio/company. So I am asking studios if they make take me on for work experience or as in intern. Or as a runner, whichever they see fit or whichever comes first.

Wednesday 3 October 2012

Rifle model and weekly scheldue

Okay, so I have been really lacking in the posting lately. Not posted since august :/

So in the past couple of weeks I decided I needed to make myself a proper scheldue to stick to. It's not as strict as saying so much per day but simply gives me a certain amount of time per week. At the moment its 10 hours of 3D work, 1 hour of updating my blog, my website and my other sites like linked in and 2 hours of looking for jobs and sending prospective emails. This seems realistic on top of my normal job.

So yeh I think i mentioned i signed up to digital tutors and so far on this rifle project I've created this...

Its been really fun creating this. There are upsides and downsides to following this from a tutorial however. The upsides are that I have learnt a lot of new techniques for polygon modelling and making sure to keep quads etc. Some stuff i knew before but just couldn't work out certain problems. Another upside is this awesome gun model I've nearly finished on was creating from scratch by me.

The downsides are that this model is completely unoriginal and because i followed hours of tutorials I cannot claim much ownership to the work, however I am still quite proud of the process as a whole. Just need to get it finished. So yeh not really my model from scratch but still a nice looking model for my personal use. Not sure if this could be showreel'd or not.

Anyway I'm also thinking to make my showreel a more generalist approach I might need to do a bit of animation. Which should be okay, I will have to wait and see what else i have planned.

Saturday 18 August 2012

Quick post

Just thought I'd post this quickly. Just seems to be a nice dusky/sunset shot of the rear of the house. Finished modelling the rest of the roof's. 

Friday 17 August 2012

Professional Portfolio Website

Also thought I should mention that I have set up a Cargo Collective type website for use as my more professional showreel/portfolio website. This will have projects that are finished and may also have some in progress pieces (might be temporarily up for now to bulk the site up a bit) marked as WIP.

The site can be found here:
http://cargocollective.com/liamkirkman

I do also have a domain name I payed for. Simple www.liamkirkman.co.uk
However in order to link this to my cargo collective account, I need to upgrade to premium which I think I might do soon.

I will keep my 'Showreel' page on my blog for now, Just in case anyone wants to quickly see some work if they are already on my Blog.

I also need to get round to compiling even just 40-60 seconds worth of work for a showreel. This is quite essential as some potential employees want to see my best effort and work instantly.


Digital Tutors and House update

It's been a while since I last posted, but I do have some stuff to talk about and show off.

Firstly I have an updated render of the house/decking project.
I decided to physically model the roof as I thought it would help make it look more realistic and the geometry isn't too dense. Much. I will do the same for the top roof, and apply a shader to them all instead of UV mapping. The house will be UV mapped soon, ready for texturing. Also the wooden supports/struts need to be textured as well as the concrete and the plants. Not sure how well it would look but I might put some planes inside the house with pictures of the rooms. It might not work out, but could try using basic geometry similar to the actual layout.

As a way to help motivate and also to keep learning new things I have subscribed to digital tutors. I know my friends at University subscribed to it and it really helped them so I think it would be a good idea to get some professional step by step training.
I'm currently in the process of modelling an assault rifle. Using the tutorial videos it has given me some great tips on a variety of modelling techniques such as good edge loops, maintaining quads where possible, clean geometry and more.

Wednesday 8 August 2012

Grass


Have been experimenting with using fur to make the grass. Isn't quite there yet but it will do for now.
I've also done a tad more modelling to the extension part of the house, which includes a gutter and extra bricks coming out of the wall for added realism and closeness to the actual house design.

Need to texture the house asap really.

Friday 20 July 2012

Windows and inside geometry

For more realism I decided to create more geometry for the back of the house, extruding inwards from the windows to make actual rooms, and then creating windows.


Edit: Also added the back door. Nothing to big to add

Thursday 19 July 2012

MindTex Software Review

Stumbled upon a great product called MindTex by a company called Frozen Flame. It uses a single diffuse/height/normal map to automatically generate other kinds of maps, like ambient occlusion and specular to name a few.

There is a standard map view where you can adjust the sliders to make sure the details are accurate (or to your artistic choice ofcourse)

A bonus which really adds value to the project is the 3D preview showing off all the maps generate. These can be toggled on and off and adjusted in realtime for instant feedback of the textures. 


After you have tweaked to your hearts content you can save out all the textures with 1 easy step. Simply click save > all > select your folder and hit save. Magically done and the files look like this.


I have just been experimenting with the 30 day trial, which doesn't appear to have any limits however I think I will definitely pay $15 for the full license which seems a great deal.
I don't really see any downsides to this really. Its just a great time saving, inexpensive alternative to creating texture maps yourself. Would definitely recommend it!


Diner Film Upload

So it was a while ago I uploaded my diner video and managed to get it looking okay on Vimeo and youtube however only today have I realised I forgot to link to it. So here it is!

http://vimeo.com/43118099

I tried embedding it on my blog post, but it didn't seem to like that.

Wednesday 18 July 2012

Texturing the decking/exterior

Parents seemed to like how it was going. I'm working on the texturing at the moment. I am kind of diving straight in there atm just see what might work.
I have been experimenting with using fur for the grass but it's not working too well so I'm not showing that off just yet. Textures are temporary and little time spent on them. The house will be UV mapped to allow for more realistic texturing. The wooden planks are just the standard wood shader and the grass is just a tileable picture.

Wednesday 11 July 2012

Patio Doors

Just a quick update, showing the new patio doors. Going to add some more details to it.


Garden Concept Work / Arch-vis

So my parent's have applied for some planning permission to have some decking in our back garden. I thought it would be a great opportunity to model how it would look based on the plans and decking styles.

Probably spent a day on it so far in terms of hours.

(The area below the raised decking shows the existing garden/patio)

I modeled the basic house shape and some of the important window/door areas and the levels of the garden to start with. Then added the decking platforms. I will add the windows and patio doors at some point. They might take a couple of days, but might also do some basic rigging and skinning them to show them open or closed. Textures will really make this pop and at the moment the decking is all polygonal modelling which I could extract the data and turn it into a bump map/normal map to use as a texture to reduce the scene size an d render time.

Friday 22 June 2012

Subway station WIP and coke can

Haven't posted in a little while. Been busy job hunting for normal jobs and animation related jobs while also getting stuff ready for my holiday soon.

Showing this quick work in progress shot of the station.


And also got a bit distracted for an hour or two and made a coke can. Its fairly high poly for something of this nature. Its more suited for maybe a product advert and too high poly for little objects in a scene.

I might actually use it in the scene just for a bit of colour, but it will obviously be quite small. I might lower the poly count on it as it won't be the focus. The text is french or italian I'm not sure.

Monday 4 June 2012

Project #1

I have started working on a scene based on an underground train station (Haven't yet decided if it's british, european or metro)

It's primarily a self set task for composition and texturing but also incorporating lighting as a learning task and staying completely away from final gather and lighting from scratch without cheats. Because it will eventually be rendered out as a still, I have the freedom to increase the quality of the textures, models, shaders and lights for the final output without having to worry about massive rendering times for a whole film.

I have put together a concept in maya, using 4 lights so far (I can see this sky rocketing if I'm not careful).
The idea behind the lighting is the warm yellow is coming from the surface and the cool blue from the underground area. The colours themselves compliment each other being opposite on the colour wheel.

During my 3rd year project I very briefly used light linking, a powerful tool to choose what objects receive light. I plan to use this more often to get things how I want them. In this example I used it for creating rim spotlights pointed at the post.


Quick note: The geometry is purely for blocking out. This will be redone

Saturday 2 June 2012

End of Film self evaluation


(Warning: Long read)

Firstly I would like to say that this project has been a huge learning curve for many aspects of the film and taught me alot.
Many of these lessons are techincal, artistic and some pure personality.

I have learnt a lot from the film, making several mistakes throughout the creation process and some mistakes still plain show in the final film. But I don't mind that.
It shows what I have done in this year and no its not perfect but I am still proud it's my work.

Secondly, I have involved the use of some new software in the case of mudbox while also learning new skills and techniques in photoshop, after effects and obviously Maya.
Mudbox was of great use to me during the process, my only regret is that i used it even more, however for what i used it for, it did speed up my workflow and create better results.

I shall try and be super critical of myself to layout what I have to improve upon.

I started the project with a very motivated mindset and wanting to get straight into the 'fun' things such as modeling the environment and objects. However I needed a clearer concept than just *a diner*

Amy and Hollie's concept work did assist me in the creative process and helped me visualise my idea better (I only wish i had taken advantage of there skills more) .
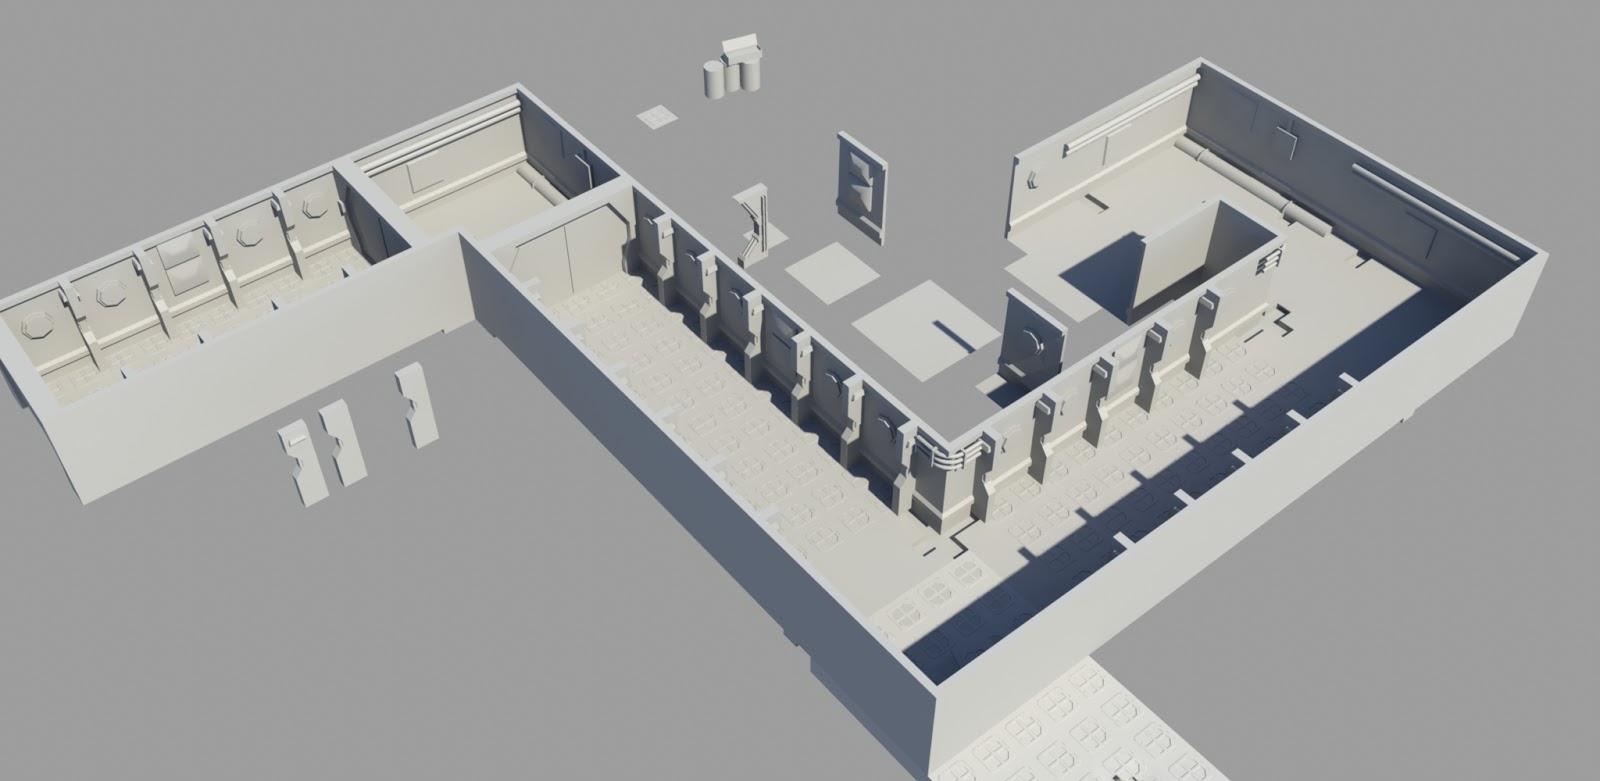
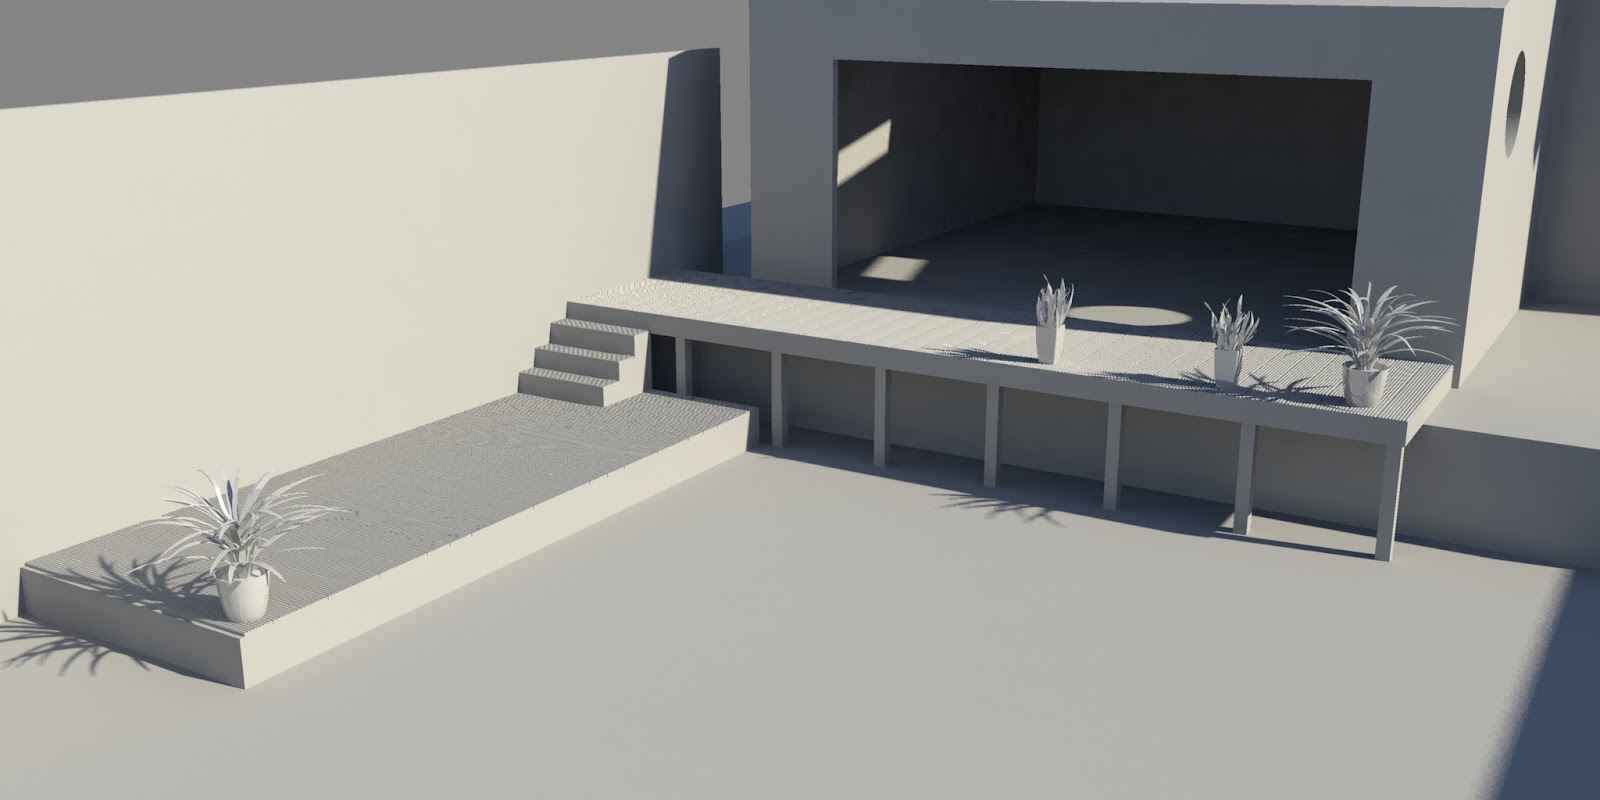
With a clearer idea, I did start work on the modeling possibly a bit to prematurely as other specifics needed to be sorted out such as story, layout and visual style.

I quickly chose to make this film purely realistic as i wanted to demonstrate my abilities as a modeler and texture artist. After much more pre production of the film I decided to have several characters in the diner to add a human element and bring it to life more.
I had amy create some quick moodboards of one of the characters and these were good but my failing was not following it up and keeping in contact. I think i might not of been as passionate as i originally was about including the characters.

I was progressing through production at a steady rate but still a little way off scheldue. I became alot more confident with texturing and shader work, becoming comfortable with bump maps, specular maps etc.
The use of Mental Ray for rendering saved me some rendering time as models didn't have to look fully smooth as models, they could simply be smooth previewed just before rending.

Midway through the project i started using mudbox for some of the texturing including the booths and stools. It has a great familiar interface which really streamlines the pipeline between it at maya and i also discovered how simple it was to go back and forth from photoshop with the paint layers.

Unfortunately at a certain point I had to abandon the characters for lack of time and designs. I think if i had of worked on the characters more, the overall quality of the film would have suffered greatly in the time.

Rendering became a much larger task then I anticipated, in the space of a couple of hours and some tinkering, the render time jumped from 8 mins a frame to almost 20!!
This was bad news, However by this point there was very little time to change and despite the rendering times, i was confident with the current look and knew post production could give it that extra little something.

Towards the end of the project i became a little bit demotivated. I simply wanted this to be out of the way with as the problems were just causing headaches. These problems were generally from using the studio computers.
I managed to gain motivation from a magic fairy and nearing the deadline I got stuck in and worked damn hard on it.

I was apprehensive about using mudbox at first as when i first tried Zbrush it seemed extremely daunting. However I enjoyed mudbox as i learnt with every tool and pallet

As i already have said, I have become a lot more confident with shaders and texturing.

Regrets:

I do often think it could have been a 2 man project as i lacked concept, visual style and character designs.

I regret not going to physically see tutors that often for extremely valuble feedback on the production.

I regret my lighting method, which created huge render times and made it nearly impossible to fine tune individual frames.

I do NOT regret dropping the characters based on my final output, But had this of been a more than 1 man film i think the characters should have been there.

I regret not working in a group because I like the structure. Everyone has a different job or 2. Although working on my own did mean I didn't have to contend with design/style clashes and i had control of the whole film myself.


Some last notes:

I am proud of the film. There are lots of aspects i would change in it still, which makes me hesitant to show parts of as a showreel.

I will post the film on my blog soon. I am having some horrible problems uploading it to youtube and vimeo as it makes the video extremely dark so i will try fix it asap.

Monday 28 May 2012

Post production work

Finished the rendering, and basically finished it. These are some thoughts and screen shots from the post production process.


The whole composition is quite large to render out of after effects with the additions of the vignettes, colour correcting and credits. The black vignette was added to give it a more cinematic filmy look. I have increased the contrast and raised the brightness slightly as it was a little dark. There is also blurry vignette to also enhance the frame. Unfortunately I am missing a background for the outside. I didn't have enough time to do this so just created a slightly yellow tinted plane underneath the diner images to show the outside as bright and letting the sun in.


I edited the sound in Adobe Soundbooth. Using the track I had (Jingle Jangle), various fades and delays and reverbs to achieve the moody music towards the end. The camera flash sound was found on a royalty free sounds website. I faded the music out towards the end for the credits to a familiar but still slightly moody tune that is played through the film.

Friday 25 May 2012

Micro Update

Getting the last few frames rendered now. Only 9 split between 3 machines so shouldn't be bad. Then going home and finish the final edit.

After Effects work

Currently working on post production work. Nearly all frames have been rendered fully, Some however are still going overnight in the studio. (I shall pick them up in the morning and slot them into my After Effects file.

I have added the blurry and black vignette, the camera flashes, adjusted the contrast and brightness slightly. I have also done a bit of painting in areas i have problems. Such as the knife area had a random light patch, which i painted over and keyframed to disappear with the opacity.


It is very subtle in still shots but very noticeable when it flashes on screen during the camera movement. So I painted it out, which I might have to do for a few more sections. The top one shows the mistake, towards the center below the knife, while the bottom image shows it painted out simply using clone tool in photoshop (Haven't worked out how to use clone in after effects yet)

Thursday 24 May 2012

Rendering

Rendering this year has proved a huge challenge compared to last years.
 The main factors that affect it are:

  • A bigger project
  • Higher resolution textures
  • Use of Final Gather (greatly increased render times)
  • 1 Long shot.
This time last year, for the train sections i was looking at approximately 5-8 minutes a frame, and the imp between 5-8 again. This years work is taking roughly 20 minutes a frame. The main reason for the use of final gather, but it has achieved the look I want. However, if given the time again i would definitely work out how to light properly to decrease render times.

I am currently nearly finished rendering my whole project out of maya. I have been in the studios full days and longer since monday trying my best to make them handle my project and they seem to of been okay. Hopefully by the morning it shall all be finished, and I'm looking at an all nighter thursday for compositing and editing. Just have to remember to post some updates and screenshots and possibly a few effects as i go along.

I look to be on target for the hand in on friday all going well. I am pleased that it is rendering out (although slow). At this stage I have had very little time to test my shots in movement, so I have had to wing it and I am fairly happy with the result. Post production should make it sparkle though with some colour correction and effects and the sound will really bring it to life.

Monday 21 May 2012

Some Lighting Changes

I thought I was ready to render today, However after a couple of test shots, I realised the environment is too dark. So I have added lights to the ceiling. But not too strong. Just there to be subtle and I think it looks nicer than before, but I'm not completely sure.
 The light with just a glow.

Actual light source, using area light.


Sunday 20 May 2012

Close to finishing

Have been lacking in post's due to frustrations of working last minute and trying to render on studio computers. (which are terrible, but are gonna have to do). Basically finishing lighting. 

Post production is where it is really going to shine hopefully. Just lots of colour correcting, and some subtle effects here and there all going well. 

Have to hand in by friday and going in tomorrow to render, hopefully done overnight if i can use 20 odd computers. That's all for now. Will hopefully get round to doing some post production blog posts with screenshots.

Wednesday 9 May 2012

Been creating some test renders to show for tomorrow's hand in. These have some post production work in such as the vignette applied as well as some colour correction.


This is also my current playblast of the scene. Unfortunately not lit and rendered due to time restrictions but rest assured this WILL be done for the degree show and will hopefully bump my grade up hugely.