Monday 23 December 2013

Turnaround and modelling

I created my turnaround for the pan head character, with a version with and without the jacket so it's easier to model certain areas of him. The t-shirt, trousers and boots will be part of his geometry where as the jacket will be a separate piece.

Start of the modelling in 3ds max

Thursday 19 December 2013

Pan-head character concept

I sketched up and coloured the concept for the little pan-head guy. I am not the best for concept work but I tried my best knowing, how much more I do of it now will help me enormously in the later stages.


I am fairly happy with him, however I think I accidentally made him look a bit older than I imagined, but it still works. The next stage would be to create a good turn around of him. Maybe draw him first in his jeans and t shirt and then jacket over the top.

Mood-boards for Reference and Ideas

So I have an idea for a new project. I say new idea but I actually sketched this vague thumbnail years ago and rediscovered it and seemed perfect as I was looking for a character piece to work on.

The character is a young kid in his garden 'playing soldier'. He is wearing a military jacket of his dad's/grandad's that is too big for him. He is also wearing a pan on his head. Other details include baggy trousers or cargo pants, a loose belt, walkie talkie and remote control tank or Humvee.
I have little experience with concepts and sketching characters let alone 3d modelling them. So I attained lots of reference images to use and take inspiration from. I compiled these in a mood-board and made notes on features I liked and would maybe put towards my character and composition of the final image.
 Next I created another mood board of textures, model ideas, details etc.

And to make this project even more challenging for me, I am going to attempt to create it all in 3dsmax instead of my normal package Maya. Models, shaders, everything!
I still plan to use photoshop for lots of texture work and mudbox for maybe some light sculpting, but I don't think I will use it heavily due to the simplistic style of the character and his props.

Monday 16 December 2013

Starting speed modelling

During my downtime between my previous project and my next project I have decided to see what I can really do under pressure, so have started speed modelling. Basically seeing how much you can get done in a set time or as little time as possible. The chainsaw below was aimed for 1 hour. But I went over by about 10 minutes because there was some final things I needed to do.

I need to think of ideas for future speed modellings and also time frames for them. Some I could do for 3 hours and some I could see how far I get in an half hour.

Tunisian Courtyard Finished

I finished my courtyard scene. There are things I would still change on it and have still to improve on in my own skills. I plan to move onto a new project soon when I've finalised my ideas.

Thursday 28 November 2013

Step texturing

Still a work in progress but I have been working on the steps the past day. They are going okay, but I think I will add some other tiles to vary it up more and add some damage and wear and tear.
Work in progress

I also have to work on the lighting a bit more, it is over exposing some areas of the scene and causing it to look washed out. Especially around the cactus plant.
The scene so far

Monday 18 November 2013

Tunisian Courtyard update

After settling in now in Edinburgh I am making the effort to finish my Tunisia project. I went back onto the scene and realised I had lots more to model so the doors below are just another model that needed to be made to make the scene a lot more realistic.

 I also was apprehensive about the vegetation in the scene. Some of the plants will be simple alpha mapped textures and some will be physical models like the large cactus plant. The leaf below is for that plant.


Wednesday 6 November 2013

Welcome to bonny Scotland

I have now officially moved into my new flat in Edinburgh, Scotland. All my stuff has arrived so I am settling in well. At the moment I am looking for 3D jobs primarily in Edinburgh but also in Glasgow which is about an hour to an a hour and a half train away.
Small post today but I shall try keep this more updated in the next couple of weeks.

Monday 7 October 2013

Moving to Edinburgh and 3ds Max

I am moving up to Edinburgh soon, so I am just starting to pack.I have been trying to learn a bit of 3ds Max recently to broaden my software knowledge, so signed up to digital tutors again to learn max from scratch. I feel its a little less intuitive then using modo as a comparison and noticeably different from maya. But I think I am getting my head around it.

Model created by me with the aid of Digital Tutors

When I signed up again, I forgot how valuable a resource the website can be. Every video doesn't just tell you what to do to create a certain object, it tells you why you are doing things in certain ways and which tool is more appropriate for the job.

Wednesday 18 September 2013

Window awning

I made this window awning/cage thing in the same way I created the birdcage. It is not finished yet, it needs a few details on it and then a normal map to give it some depth.

Monday 2 September 2013

Some more details in the scene and sculpting a column

Today I have been working on a column for the scene. Atop the column shall also be a pot similar to the pots already in the scene. Have placed it in the scene temporarily but it might go in a different position and needs to be finished. Base mesh created in maya then sculpted in mudbox. Turntable below.


Sunday 1 September 2013

 Not a large update, just finishing the steps and a few other areas.


Thursday 29 August 2013

Pots, Roofing and changes

Current render of the scene. I have applied basic coloured shaders to simulate what the image would look like. I have used some of the paint effects in the visor to create temporary foliage in the scene.

Thursday 22 August 2013

Wednesday 21 August 2013

The difficulty of trying to match proportions and shapes from a photograph

It has proved very difficult to try match the image shape to shape for the overall scene. I think I have the camera roughly in the right place and now some of the geometry is working. However some doesn't match up quite so well, so I might just have to adapt it to make the image look interesting enough.

Current state of the scene

Monday 19 August 2013

Finished Birdcage

So I finished the birdcage. Was having some issues with the textures but thankfully fixed them. It isn't perfect and the normal map could be a tad better, but overall I think its turned out great. Might be a bit over exposed just because of the physical sun and sky.

Normal Map version to left. Diffuse, Normal, Spec and Transparency Map to right 

I have also had trouble trying to match a similar camera angle from the reference photo of the main scene, to the maya scene.

For now I have made a quick blueprint of the rough layout of the scene and will use this in maya to build up the environment with changes here and there.

The green is an approximation of where foliage will be.

Birdcage Midway

More texturing on the birdcage. Added the legs so it is actually standing on something. Need to do the sphere shape on top now using some of the existing shapes for the texture.


Sunday 18 August 2013

Modelling and Texturing of the Birdcage

I started working on one of the assets for the Tunisia scene. The bird cage is immediately striking as quite a large in interesting object in the scene. It also looks quite complex.
Reference
 I decided to not individually model the spirals and chose to make a base mesh of the cage and then apply a diffuse texture, with transparency to see through. A normal map to give all the spirals a bit of depth (it might need exaggerating more with a displacement). As well as a specularity map to give it a glint of light on some of the edges. Obviously still a work in progress, but I am looking forward to the finished result with all the blue links on as well.

Render

Wednesday 14 August 2013

Blocking

I have started mocking up a very quick scene to get some of the proportions right. At this stage it is extremely crude, but it's helping to lay the foundations of the area. Some objects don't fit together properly or match up with others. But its there as a template, I need to fine the camera angle more to better match the reference photo.

New Project: Tunisian Courtyard

After finishing my underground project I needed something else to get my claws into. I am starting a new project and this time it challenges me some more.

A year ago I visited Tunisia with my lovely girlfriend. A lot of the scenery is quite nice and some of the ruins at Carthage had some great texture to them. However it was in Sidi Bou Said, where I discovered some real gems. All the buildings were painting in white and blue which sounds quite odd but makes the place look really pretty and uniform.

In this one particular area is a museum of traditional dress, furniture and architechture and a nice courtyard. Its here that is the project.

This is my favourite image of the courtyard and I intend to recreate it in 3D. I might extend the right of the image to incorporate something original but still fitting with the image.

I also have other reference images which I will use to create statues, tiles, chairs, tables, signs, bird cages (They have lots of birdcages in tunisia)

What looks like a glorified rotoscoping of the images, is actually a visual guide to help with polygons in the scene. Which areas will be dense, which areas are quite sparse. It also helps to work out compromises and also just generally break down the scene into its different components.

I think the challenging components for this project will be the plants and foliage (something which I have little experience with) and also I think it will be harder to craft the realism compared to say indoor images. Things like the statues, pottery and plants will also help me to become better with the pipeline between Maya and Mudbox for sculpting and hopefully try some texture painting.

Sunday 11 August 2013

Finished Underground Scene

I have posted this nearly everywhere else, so I may as well post the finished result here.
If you want to see a higher resolution version, it can be seen on my website here:
The Underground

Saturday 10 August 2013

Close to Finished

With feedback from close friends and the CG Society Thread I post to, I have developed the scene more and more. Details are really making it pop now. The scene looks unfinished but it is to be edited in Photoshop to really bring it to life.

I would also like to take this opportunity to plug my own website for anyone that doesn't know about it. Its recently had a few changes so it looks a bit sleeker now thanks to the new logo.

You can also follow me on Twitter for updates on my work.

Tuesday 6 August 2013

The difference between a render and post production

This is a current render of the scene without any additional post work

This image is very close to the final look I am after for the shot. It is looking very moody and I am liking some of the lighting. Although there is still a bit more work to be done in Maya. As well as rendering out a few different passes (which will be a small challenge in itself) for Main Diffuse, Material ID, Specular, and Depth for creating effective blurring at long distance and for dust and dirt in the air. 

Saturday 3 August 2013

Getting there...

Some significant changes since my last post. I have been away for at least a week so I'm ready to carry on with this project and finish it. Most important things to do are the Train shaders/textures (I would say most difficult to get looking right) and finishing the lighting so all the details can be seen.

Tuesday 16 July 2013

Tunnel Textures and some details

Still powering through some of the textures and shaders. The tunnel one is the same as the walls (as you can see). But it was a little difficult to UV map because of the shape. After that was sorted it is looking good. However, I might be overusing that tile shader a bit. Maybe it doesnt need to run all the way down the tunnel?
Some of the lighting is temporary, purely to see how the shader on the tunnel is looking

Monday 15 July 2013

High Res

Just a test of the resolution I will be outputting the final image to.

Thursday 11 July 2013

Steps, Door and sign texturing

So I have been creating some more textures for the scene. Most I have briefly outlined below but I have also started on the train itself which might prove to be a little difficult just because of the amount of different materials it is made of. Next things to do would be the concrete sections either side of the stairs and the wall where the blue door is.

The door shader consists of a diffuse, spec and bump map.

The steps were actually made using multiple shaders linked together with the layered shader node. Yellow strips with an alpha map to reveal concrete consisting of a diffuse and normal map underneath.
Current state of the scene. Starting to add a few details here and there is really bringing the scene to life.


Thursday 4 July 2013

Underground Texturing & Lighting

Current state of the underground scene so far.

The lighting for the vending machine is temporary. I want to get a better effect like the light is actually coming through the plastic front panel. I also used 4 lights to light the front of the vending machine which is quite expensive scene wise but gives off the look that there are multiple bulbs inside. There might be a better way to achieve that effect without all 4 lights though.

The image has some post work on it such as grain and chromatic abberation.

The studded texture towards the edge of the platform has been changed. It is a lot more realistic as it was sourced from concrete studs were as before it was metal so it didn't look quite right.
I am liking the lighting towards the right of the image. I have been balancing too much and too little light and trying to encompass some of the details like the security camera but without too many lights.
I have also used the soft select tool on the stairs to make them not so perfectly straight lines which helps bring more realism into it and break up the lines.


Tuesday 11 June 2013

Games Britannia Festival and textures for the Subway station


I recently came into an opportunity to be part of a workshop run by Sumo Digital, a Sheffield based games company. The workshop is focused towards the company's work on certain games and how the assets are created and incorporated into their engine. It also allows participants to work with developers to use there own assets and get them functioning in the engine.

It also provides a good meet and greet time for graduates like me and hopefully the chance to network a bit.

Carrying on with main project I have been adding some more textures to the subway station. I have been sourcing textures from CGtextures.com which has really helped. Also normal maps and other maps were made using crazy bump with some adjustments in photoshop.

The far right of the scene is starting to look quite nice. I am not sure if I am keeping this particular tile design on the wall but it works for now. Also I have to alter either the lighting or the specularity of the material because its creating a horrible section between the stairs and the vending machine.

Current progress of the station
As you might remember a little while back, I created the colourscript for the scene to visualise lighting and colour. I knew I wanted a red-ish glow coming from the vending machine and bouncing off the floor. Below is just 1 attempt at it on a blank scene. I am still trying to work out the best way to create it so will look more into whether the material should have some form of light coming from it or if light should be made to fake it.
Experiment with lighting

Tuesday 21 May 2013

Train Modelling Progress

I have been working a lot more on the train adding windows and doors to the sides. One of the parts I wasn't looking forward to modelling is the 'undercarriage' part between the main train and the tracks itself. I took a risk and just went straight for it with little to no reference. I think its turned out well and I am happy it looks good enough considering it actually won't be shown off at all.
Current model of the train. (windows removed temporarily)
Undercarriage of the train

Monday 20 May 2013

Colourscripts for the Underground Scene

 I have added some more details to the underground scene and now I am getting close to texturing but first I will sort out the lighting at least to a decent standard. I always had these ideas of where light sources would be but it helps to 'paint' them on on. Some of the lights in the scene are already looking nice its not a case of actually tweaking them and adding some more light to areas of interest.
A very rough colourscript of lighting and colours in the scene
A very early render of the atmosphere. Need to actually create light in more areas to pick out the details.

Thursday 16 May 2013

Bike Shaders and Chromatic Aberation

Work in progress
Been working more on the motorbike. Mostly on Animation but today have been working on the shaders. Thankfully this is quite an easy process because very few objects need to be uv mapped (and even those are simply planar projections so not much hassle there).

I have added a bump to the engine's logo 'Dafra' and also there is a bump on the bikes rubber handles which work really effectively.

I have also been experimenting with trying to get more realism from my images so I rendered out a single image and then tried adding 'Chromatic Aberation'. For those that don't know what this is, Chromatic Aberation is a distortion on a real world camera lens that give a subject an ever so slight colour fringe depending on how the light is split. Ironically, most professional photographers try to remove this colour fringing to create better looking images while CG Artists add it to create realism in the picture and to better reflect a real world camera.

The above process was quite basic, just a simple case off-setting the colour channels of red and blue. However, for an even more realistic look I should use a depth map to control how strong the effect is closer and further away from the camera.

Saturday 4 May 2013

Bike Animation Work

The bike animation so far. Its getting there. Need to create the movement for the rest of the objects and also fine tune the animations of some parts to look nicer and more flashy.

More progress on the bike animation

I am slowly getting there. I have been quite busy lately trying to get my showreel sorted out for a possible job *fingers crossed*

Will post up the showreel soon once its uploaded

Showreel

Finally got around to creating my showreel. Quite a few months late but there we go.
Here is a link to the vimeo version: http://vimeo.com/65107712


Monday 29 April 2013

Lava Cavern Environment


This was the environment I was working to create while at Red Star 3D. I stumbled upon this image on my memory stick so thought I might post it. My favourite part was creating the atmosphere with fog and lighting. The thing that could be improved most was the lava texture but at the time that was placeholder.

Wednesday 24 April 2013

Animation Test of Motorbike

This is a test of the kind of animation I think James is looking for. Will send this over to him just to show what I did as a first test.
Obviously there is the rest of the bike to do. But this short video is proof of concept.

Saturday 20 April 2013

Visit to Renfrew

I recently visited a company called Renfrew Group International. They are a product design/engineering office and workshop based in Leicester and they gave me a guided tour and a look at how some of there work is created as well as their future plans.

They mainly work with CAD software and data so its a different kind of industry to what I am used to seeing or experiencing. However after a friendly chat with the Creative Projects Manager he kindly offered me a Model for me to experiment with and to ultimately create this 'Exploding' animation of a motorcycle.

This would involve creating some animations of the motorcycles parts individually separating out into all its separate components. Its an exciting project and is great to work with a model that is highly detailed.

The downside is that the model is an exported .obj from the CAD software, so it has messy topology and a thousand or so individual parts to control. The topology is fine however its more about organizing the parts and making sure each object has all the polygons it needs. It sounds complicated but really, its just a long process to tidy it up.


This is the bike itself, looking very realistic modelling wise. As well as the animation process I will need to assign realistic shaders which might be another big hurdle just because that is probably my weakest skill.

Underground Plan

I have been lacking updates recently. I intended to put up a post or two before but was too tired.

Anyway I have gone back to an earlier project to focus on some environment design. And really trying to focus on modelling, texturing and lighting as well. Hopefully this is a good path to lead me towards roles such as environment art, or environment assets.


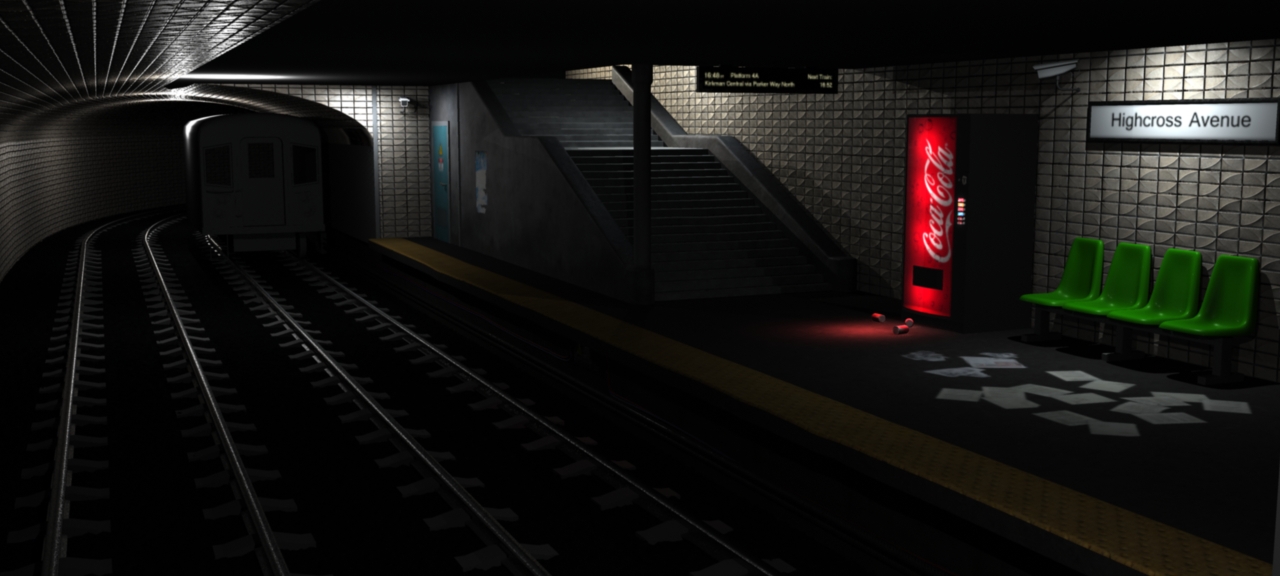
I have kept the rough layout of the objects in the scene from my earlier concept frame, however this time I have changed the camera angle. I like it more and it means you can see more of the platform and more of the track at the same time. The tunnel to the left looks empty at the moment, but the curved track around will help disguise the emptiness as well as the train carriage will also block off some of the space.

This is intended for a single frame shot due to the nature of the set and composition, so I can really crank up the texture, modelling and lighting details. And I will be adding some things in post using photoshop to create glows from the lights, grain, chromatic aberation, dust as well as the usual colour correction.

The 2 main light sources I want in my scene will be the light coming from the floor above the platform and cascading down the stairs nicely highlighting the edges of each step as well as outline the column support and the vending machine. The second light source will be the few lights coming from the train itself, so the tunnel is dark, but the area leading from the tunnel to the current area of the station will be lit by a red and white glow, picking out some details below the platform. I plan to add more cables and electrical type boxes to add some much needed detail to part where the platform joins the train tracks ground.

Only a few models in the above shot are proxy's. The vending machine might be changed slightly but it depends how much detail I add with the texturing. The train will have a lot of detail than anything else, it will probably be the most poly intensive part of the scene.


I have been using some reference images for this but have been struggling to really decide what kind of underground station it is. Most of my designs are a bit of a mash up between american, french and british.